Example:
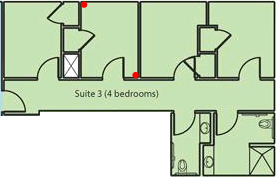
Two points…
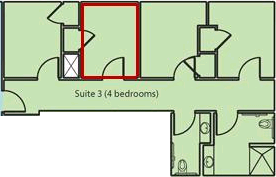
…results in a rectangular-shaped room.


ResCenter’s room mapping feature allows a staff member to use a Room Selection Floor Plan image to create a map of selectable spaces representing each room. Each space can then be chosen by a patron by using a graphical interface via MyResCenter Web.
Staff members can use the Map feature to select points on a Room Selection Floor Plan image, which will create a room’s coordinates. Alternatively, using the Edit feature allows staff members to enter or edit the coordinates using X and Y values. Refer to the Edit Room Coordinates section for more information on editing coordinates.
Use the following procedure to map room coordinates from the Location Images page:
1. Select Location Images from the Web section of the Setup menu.
2. Search for the linked image location you want to map.
3. Click Map next to the location in the List of Facility Image Links grid. The Room Coordinates page will be displayed.
Note: For the Map link to be available, the Room Type must be Floor, and the Image Type must be Room Selection Floor Plan.
4. In the [Floor Name] - Room Coordinates grid, each room will be listed. Click Map next to the desired room start the mapping process.
5. Select a coordinate mapping method by selecting either Rectangle (Two Points) or Free-Form (Four Points).
•Rectangle (Two Points): Requires selecting two points diagonally opposite of each other. The room’s shape will be a rectangle based on these two points.
•Free-Form (Four Points): Requires selecting four points to form the room’s shape. This option maybe useful for rooms that are not shaped like a rectangle.
6. Optional: Select a Pen Color from the drop-down menu. The pen color is the color the room outline when mapping the room coordinates.
7. For Rectangle (Two Points): Hover the mouse over a room’s outline on the floor plan image. Click once in the corner of the room. Click once again in the diagonally opposite corner of the room. A rectangle will be created based on these two points.
For Free-Form (Four Points): Hover the mouse over a room’s outline on the floor plan image. Click once in the corner of the room. Click once again in the next corner. Continue with the last two corners. A free-form shape will be created based on the four points.
|
Example: |
Two points… |
…results in a rectangular-shaped room. | |
|
|
| ||
For Free-Form (Four Points): Hover the mouse over a room’s outline on the floor plan image. Click once in the corner of the room. Click once again in the next corner. Continue with the last two corners. A free-form shape will be created based on the four points.
|
Example: |
Four points… |
…results in a quadrilateral-shaped room. |
|
|
| |
8. After clicking the room corners, a shape will appear showing the outline just created.
If necessary, the room’s shape can be re-mapped using the following steps.
•Click Map next to the desired room. The room’s outline will appear and a Redo link will be available. Click the Redo link and repeat steps 5-7.
•To cancel re-mapping the shape, click the Cancel button.
9. If necessary, the room coordinates can by fine-tuned by using the Edit feature. See step 4 of the Edit Room Coordinates section to edit room coordinates.
10. When finished mapping rooms, click the Close button.